> ## Documentation Index
> Fetch the complete documentation index at: https://kb.reflow.help/llms.txt
> Use this file to discover all available pages before exploring further.
# Quick Start
## Adding the Service
Reflow runs as a service on your station. Add **ReflowService** from the Palette to finish setting
it up — see [Niagara Installation](/getting-started/niagara-installation) if you haven't installed
the modules yet.
1. In Workbench, open **Window > Side Bars > Palette**.
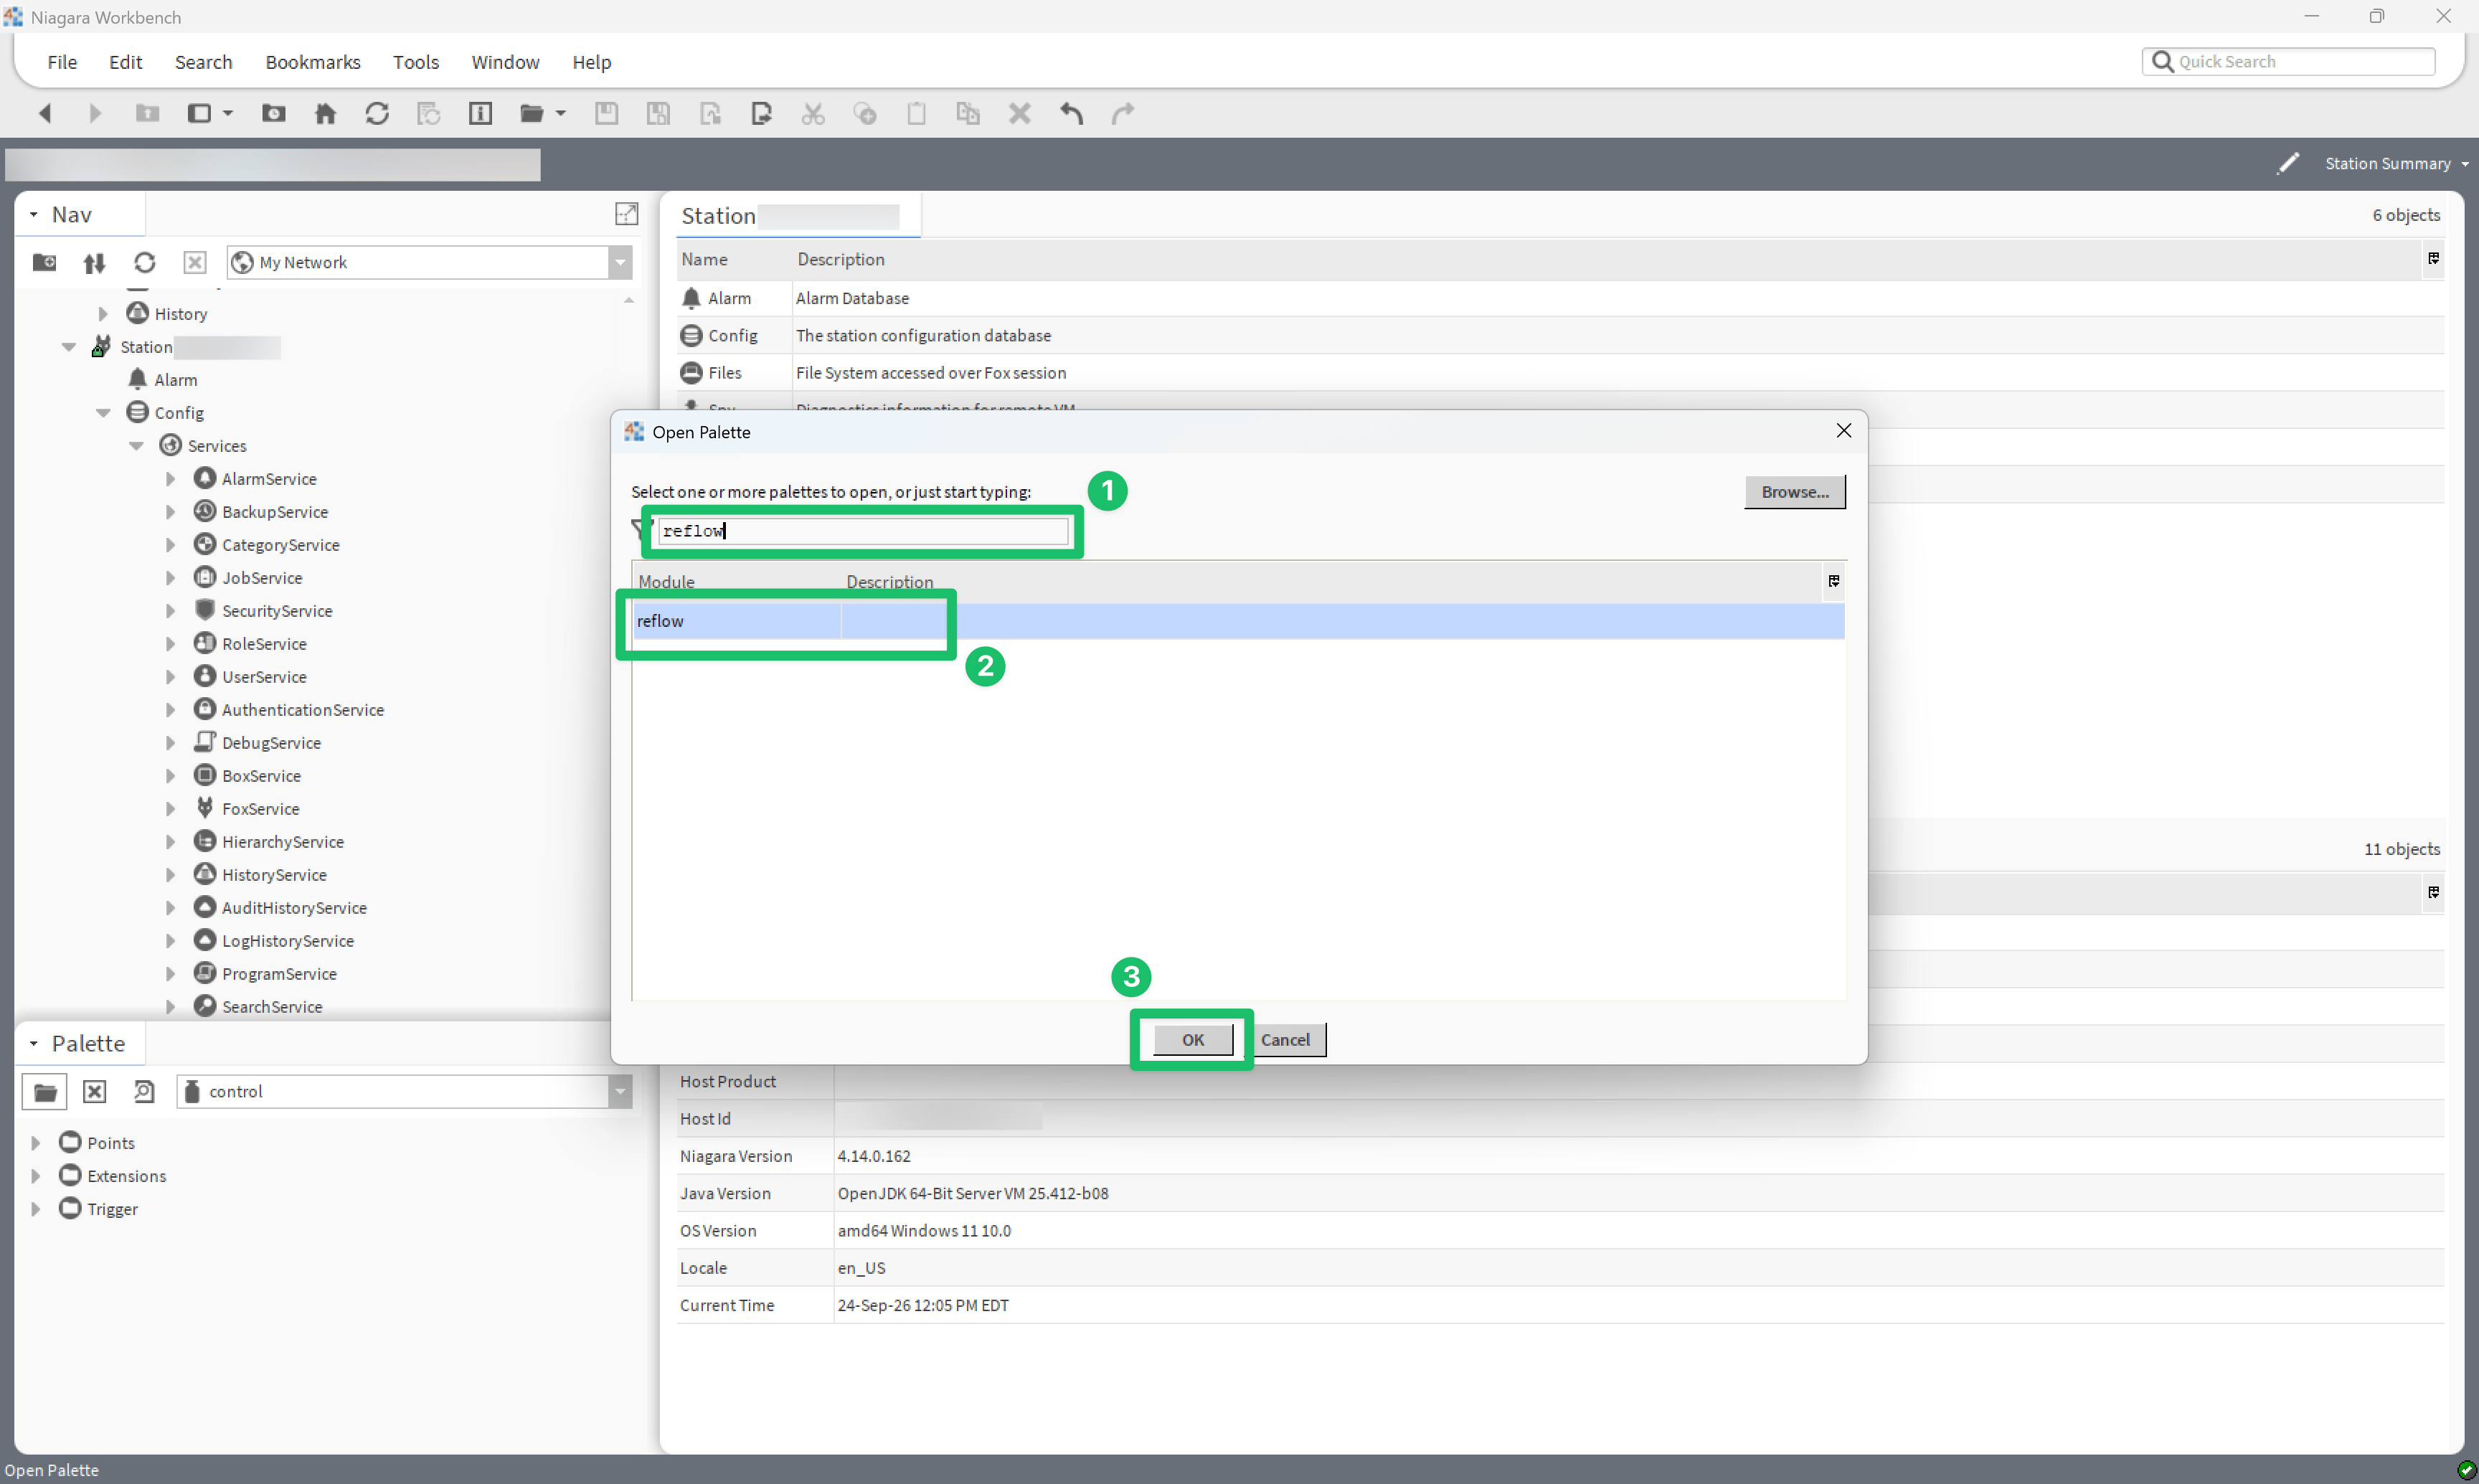
2. Click the folder icon to open the **Open Palette** dialog.
3. Search for **reflow**, select it, and click **OK**.
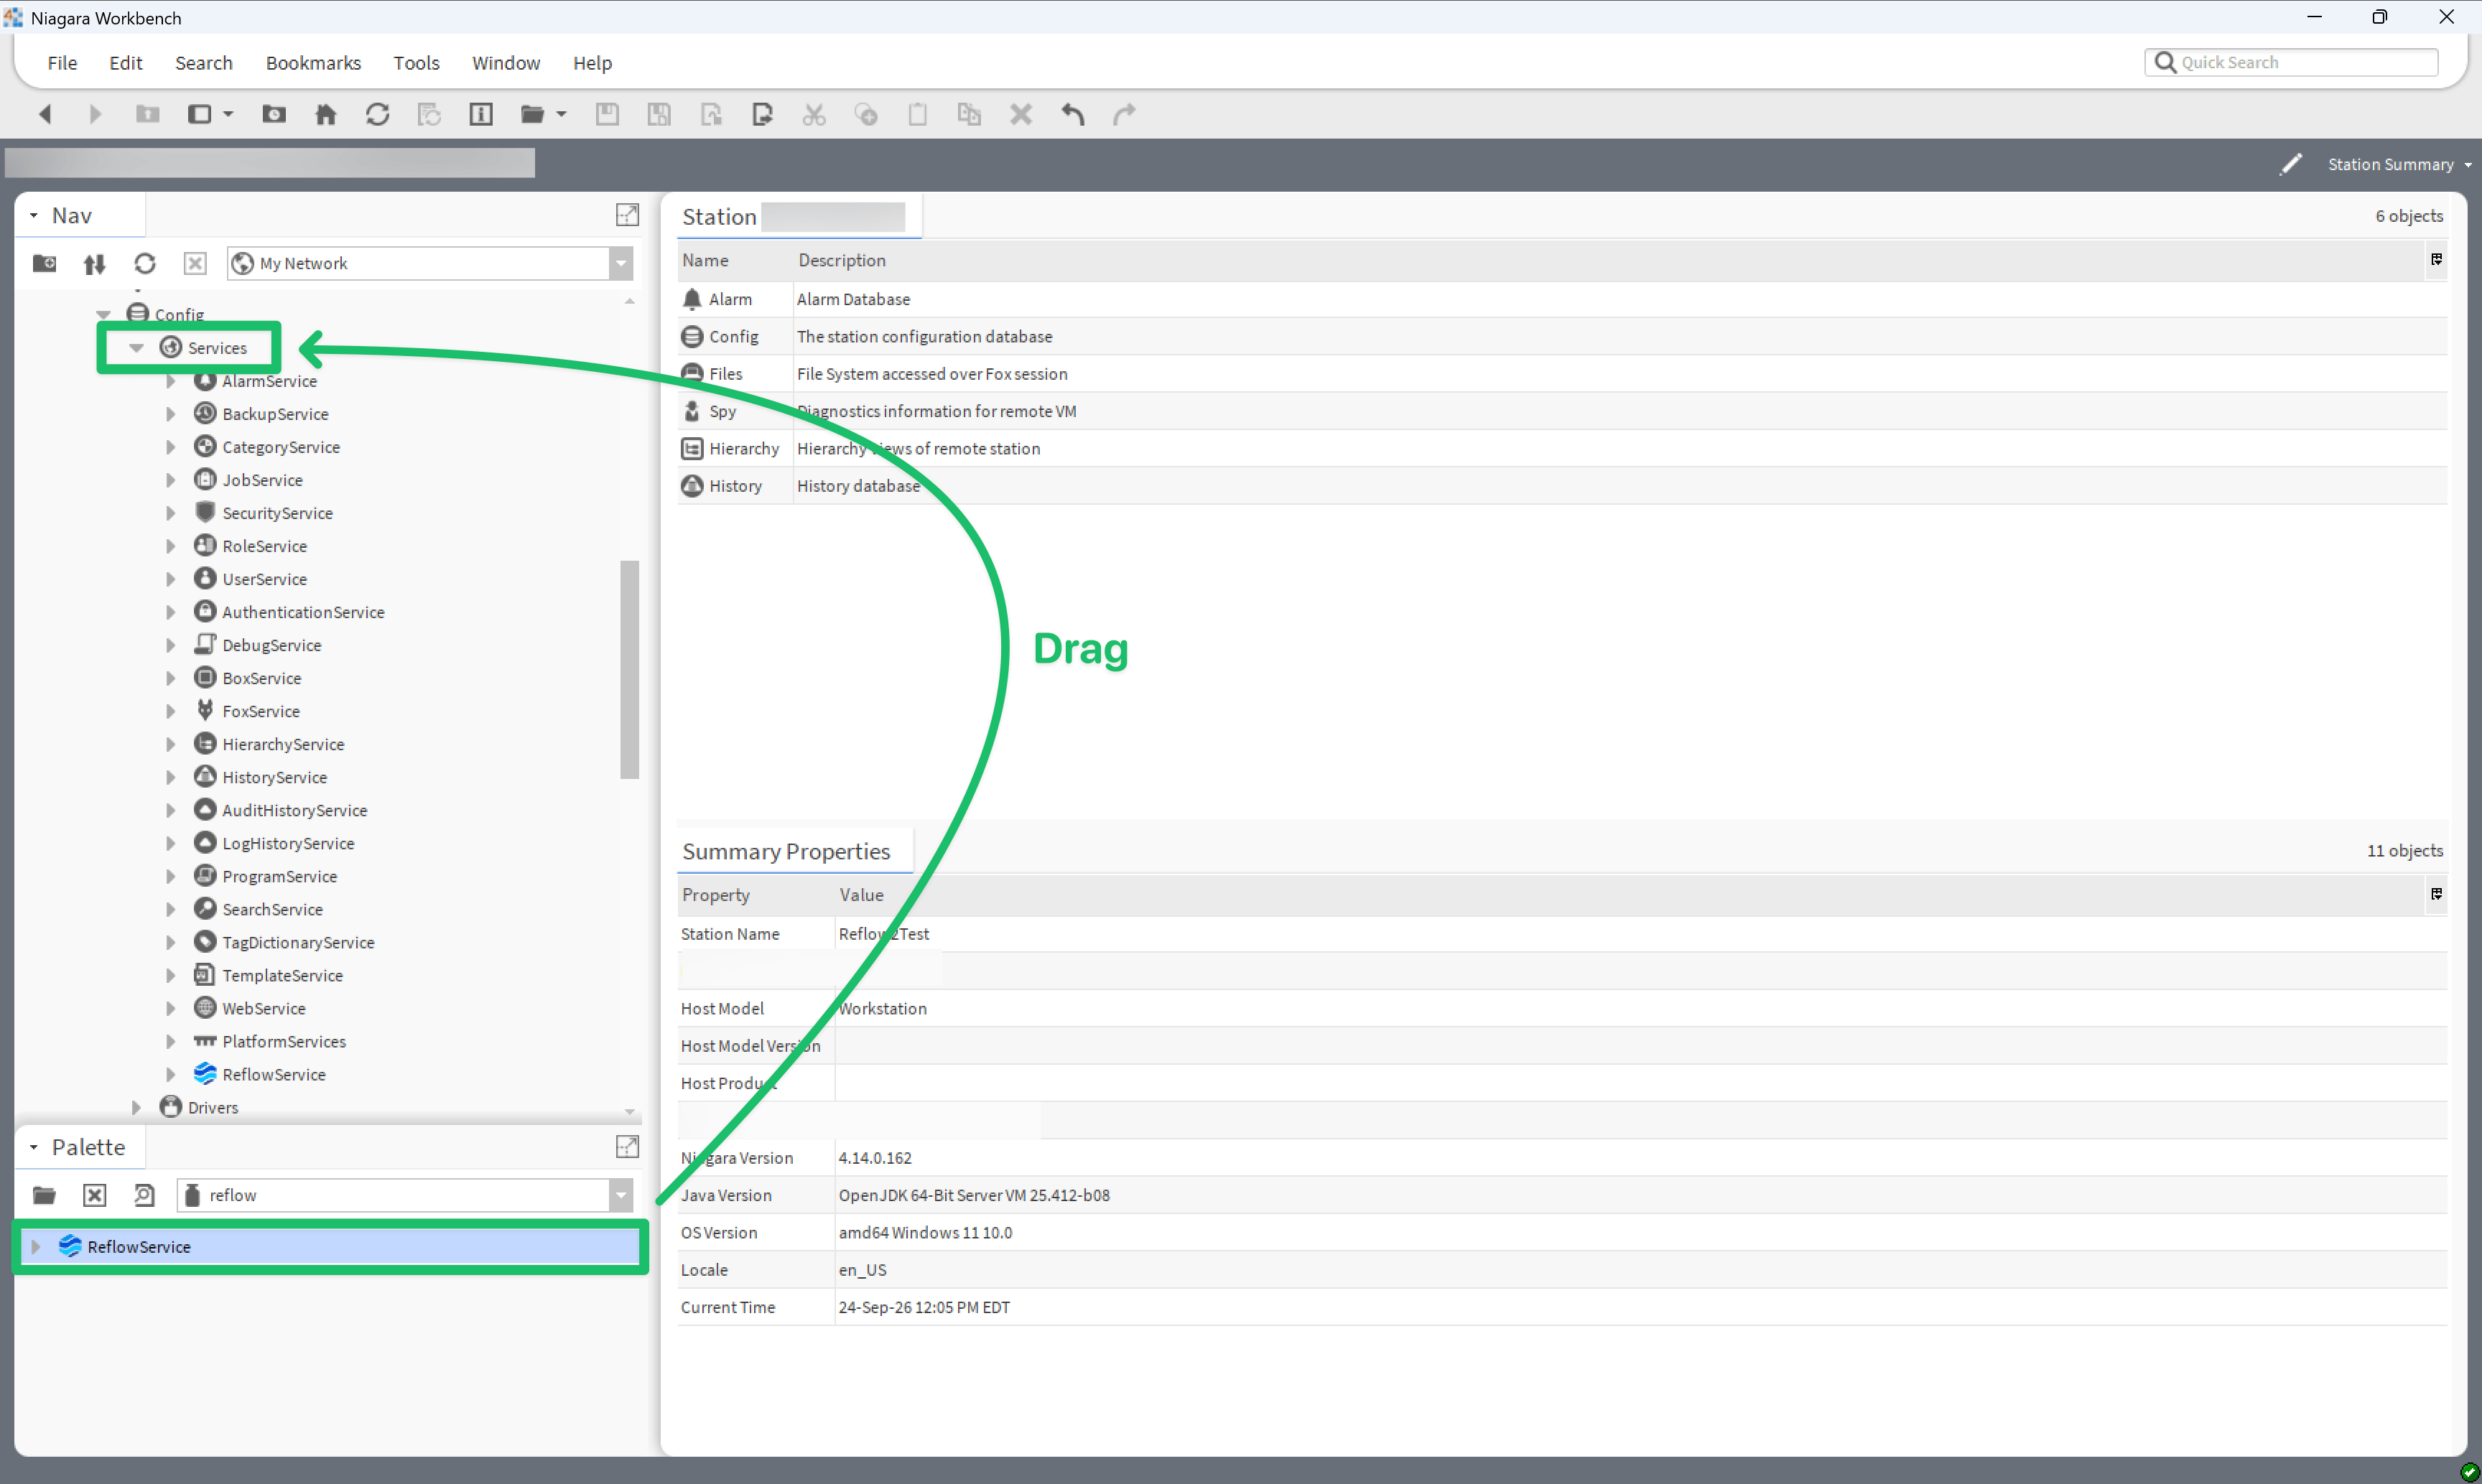
 4. Drag **ReflowService** from the Palette into **Services** on your station.
 ## Configuring Your Content
Reflow is set up and configured in the Config View — the workspace where system integrators build
out a site.
Find **ReflowService** under **Services** in your station tree. This works the same in Workbench or
in a browser — if you haven't set up a nav file, logging in from the web takes you straight to the
station tree.
1. Double-click **ReflowService** to open the Content View.
2. Select **Config View** from the view dropdown at the top right.
Or right-click **ReflowService** and go to `Views > Config View`.
Alternatively, go directly to `https://[STATION_ADDRESS]/reflow/config` — bookmark it for quick
access later.
This URL opens Reflow in fullscreen, without the Niagara Web UI around it. Refreshing your browser
keeps you inside Reflow instead of bouncing you back out. We recommend this method for the best
Reflow experience in a browser.
## Starting Your First Project
The first time you open the Config View, Reflow shows a welcome screen prompting you to create your
first project.
## Configuring Your Content
Reflow is set up and configured in the Config View — the workspace where system integrators build
out a site.
Find **ReflowService** under **Services** in your station tree. This works the same in Workbench or
in a browser — if you haven't set up a nav file, logging in from the web takes you straight to the
station tree.
1. Double-click **ReflowService** to open the Content View.
2. Select **Config View** from the view dropdown at the top right.
Or right-click **ReflowService** and go to `Views > Config View`.
Alternatively, go directly to `https://[STATION_ADDRESS]/reflow/config` — bookmark it for quick
access later.
This URL opens Reflow in fullscreen, without the Niagara Web UI around it. Refreshing your browser
keeps you inside Reflow instead of bouncing you back out. We recommend this method for the best
Reflow experience in a browser.
## Starting Your First Project
The first time you open the Config View, Reflow shows a welcome screen prompting you to create your
first project.
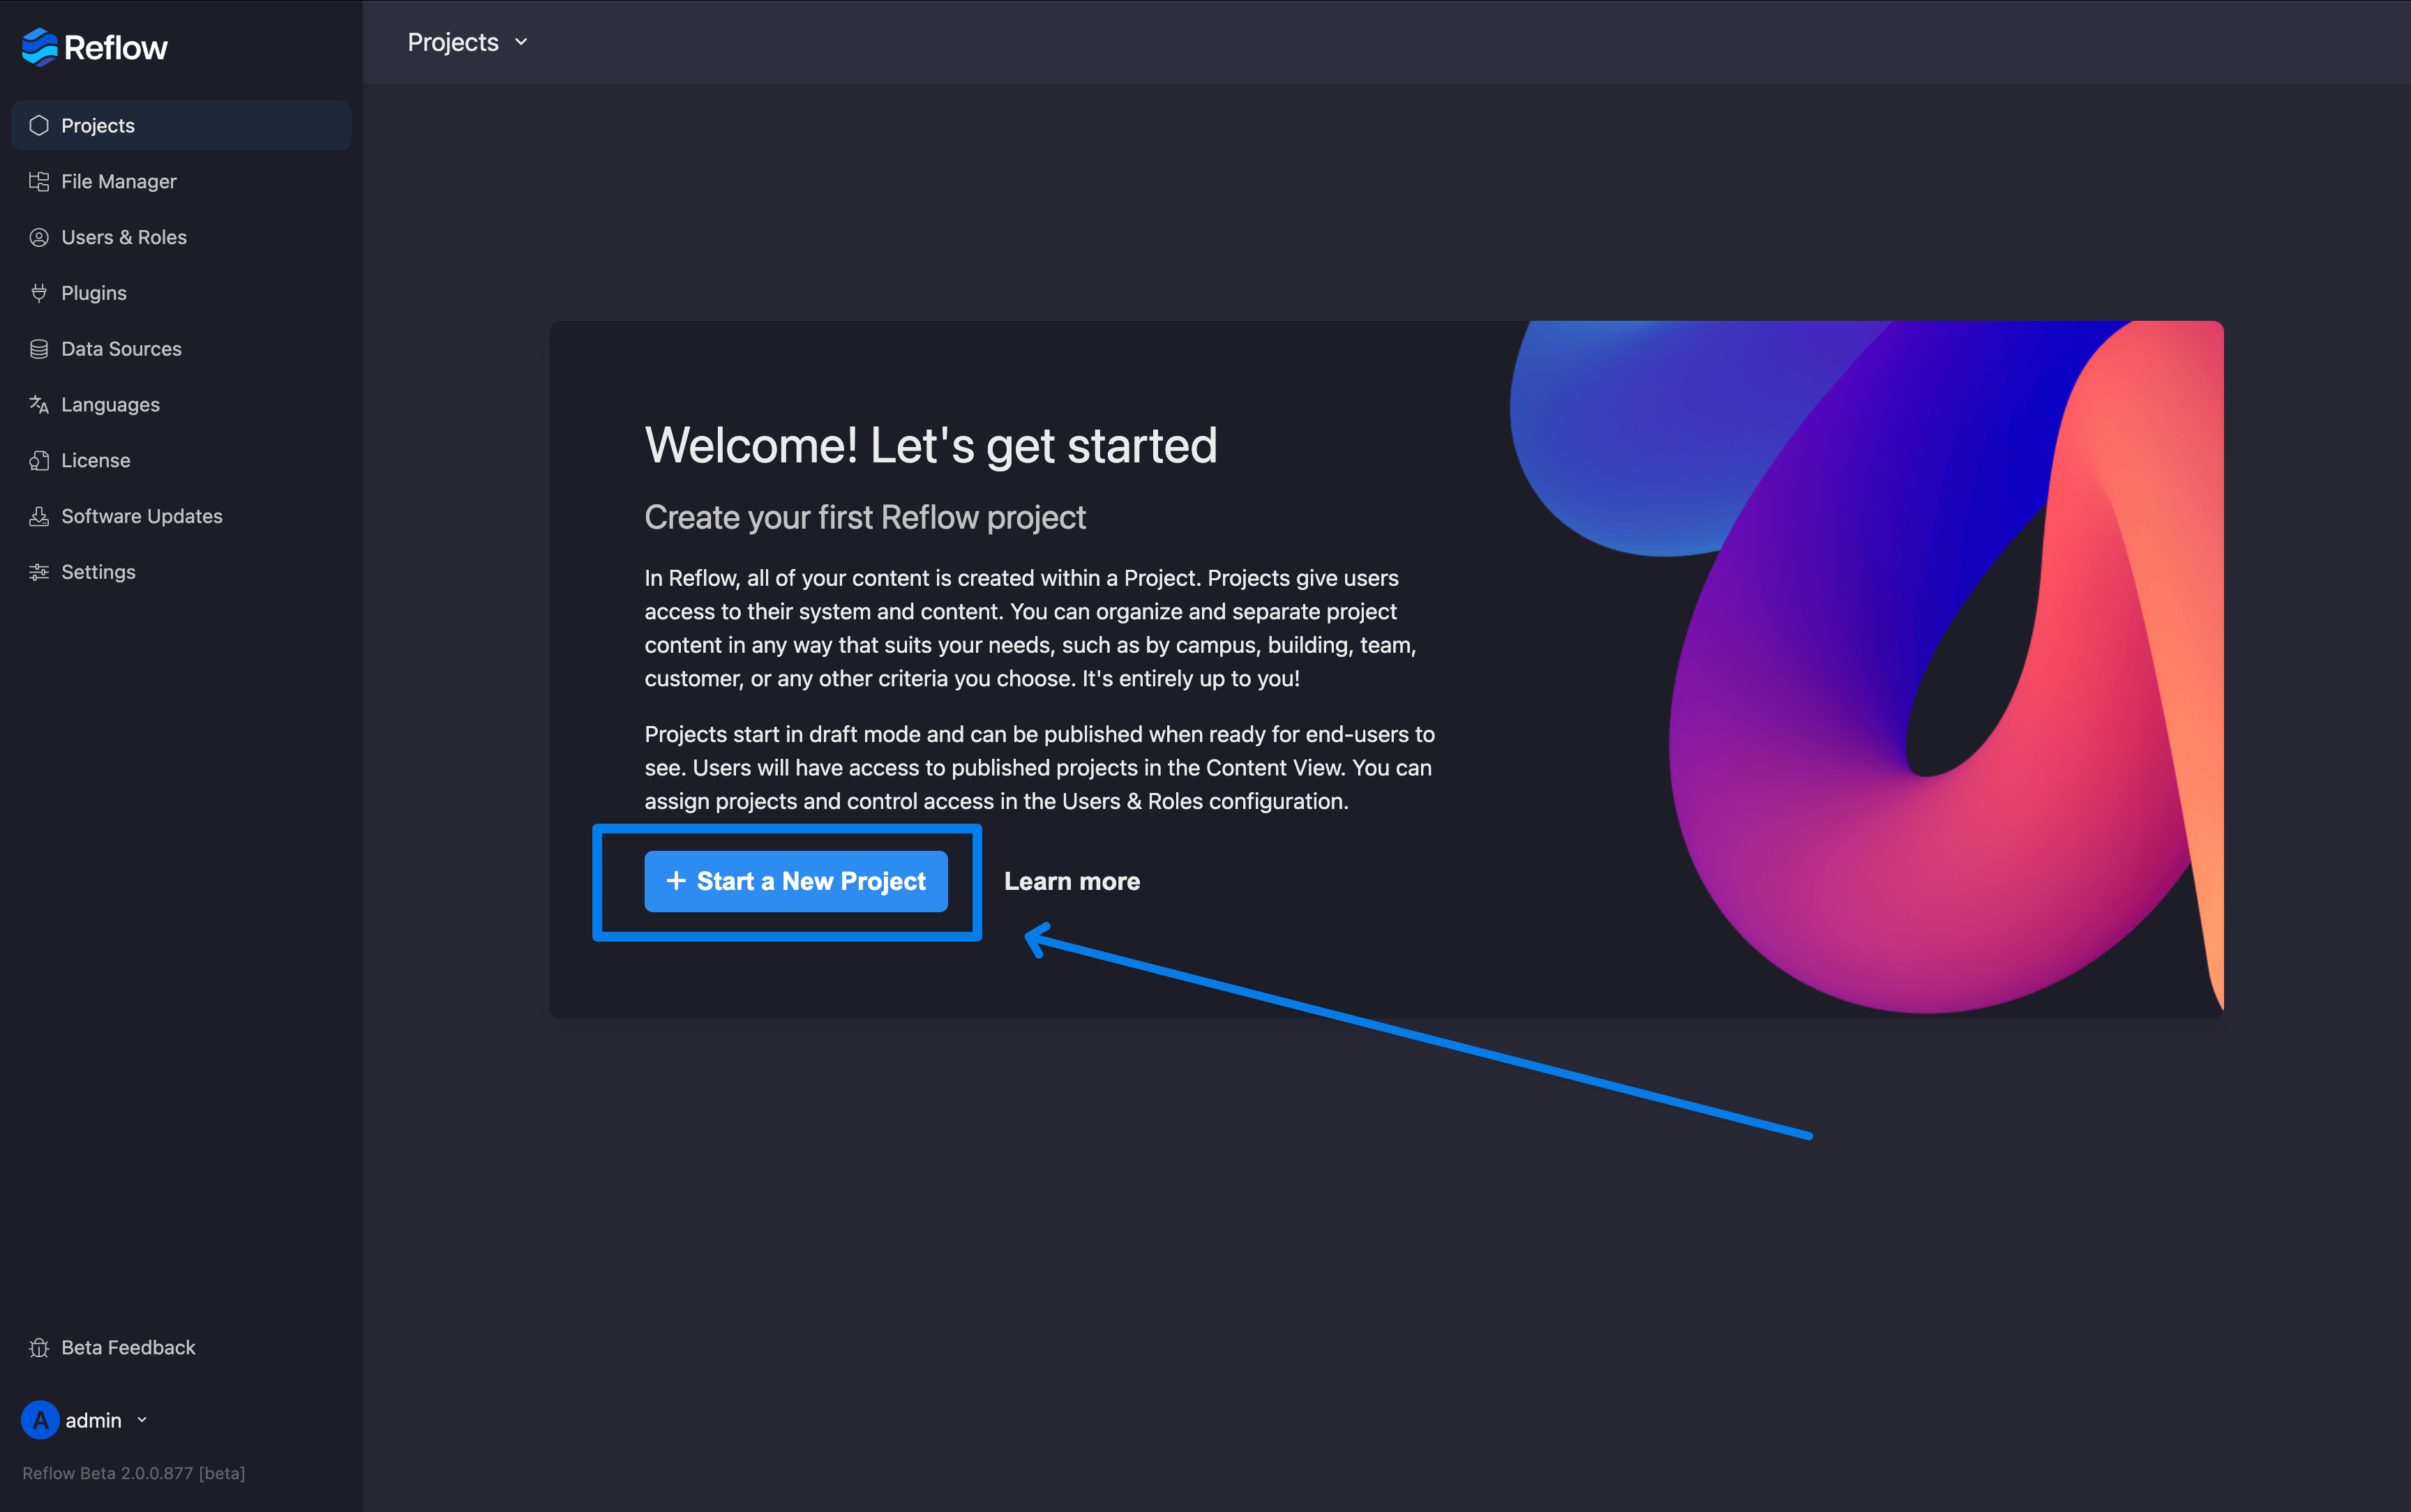 1. Click **Start a New Project**.
2. Give your project a name — this is required.
3. Add a description and image if you'd like — both are optional.
4. Click **Create Project**.
Your new project appears in the projects list. Click it to open.
The first time you open your project, the Getting Started Wizard walks you through initial setup —
logo and hero images, colors, weather, and your first building. See Getting Started Wizard for
details.
## Publishing Your Project
Your project starts in draft mode, which keeps it visible to editors only until you publish it. See
[Projects](https://docs.reflow.help/app-config/projects) to learn about Reflow's draft and publish
system.
The Content View stays empty until your project has been published.
## Viewing Content
The Content View is where end users interact with Reflow. It displays your published project inside
the Niagara Web UI, so operators get the full interface without leaving Niagara.
Double-click **ReflowService** in your station tree to open the Content View. If another view is
showing, select **Content View** from the view dropdown at the top right, or right-click
**ReflowService** and go to `Views > Content View`.
For operators who don't need the Niagara Web UI around them, the Redirect View shows the same
content fullscreen — see [Reflow Service](https://docs.reflow.help/appendix/reflow-service) for a
full breakdown of Reflow's views.
## Getting Help
If something isn't working, these are the fastest places to look.
* If you run into problems viewing or using Reflow, see
[Troubleshooting](/getting-started/troubleshooting).
* If the problem is with licensing, see the troubleshooting section of
[Licensing](/getting-started/licensing#troubleshooting).
* If you can't find an answer in the documentation, reach out through the live chat on the
[NiagaraModules site](https://niagaramodules.com/contact).
This documentation is built and hosted on [Mintlify](https://mintlify.com), a developer documentation platform.
1. Click **Start a New Project**.
2. Give your project a name — this is required.
3. Add a description and image if you'd like — both are optional.
4. Click **Create Project**.
Your new project appears in the projects list. Click it to open.
The first time you open your project, the Getting Started Wizard walks you through initial setup —
logo and hero images, colors, weather, and your first building. See Getting Started Wizard for
details.
## Publishing Your Project
Your project starts in draft mode, which keeps it visible to editors only until you publish it. See
[Projects](https://docs.reflow.help/app-config/projects) to learn about Reflow's draft and publish
system.
The Content View stays empty until your project has been published.
## Viewing Content
The Content View is where end users interact with Reflow. It displays your published project inside
the Niagara Web UI, so operators get the full interface without leaving Niagara.
Double-click **ReflowService** in your station tree to open the Content View. If another view is
showing, select **Content View** from the view dropdown at the top right, or right-click
**ReflowService** and go to `Views > Content View`.
For operators who don't need the Niagara Web UI around them, the Redirect View shows the same
content fullscreen — see [Reflow Service](https://docs.reflow.help/appendix/reflow-service) for a
full breakdown of Reflow's views.
## Getting Help
If something isn't working, these are the fastest places to look.
* If you run into problems viewing or using Reflow, see
[Troubleshooting](/getting-started/troubleshooting).
* If the problem is with licensing, see the troubleshooting section of
[Licensing](/getting-started/licensing#troubleshooting).
* If you can't find an answer in the documentation, reach out through the live chat on the
[NiagaraModules site](https://niagaramodules.com/contact).
This documentation is built and hosted on [Mintlify](https://mintlify.com), a developer documentation platform.